Aaron Blaise Offers Tips On Getting Started With His Favorite 2D Animation Software
Hello everyone! As many of you may know my background is in traditional animation (aka 2D). I worked on many films over the years including Mulan, Beauty & The Beast, Aladdin, The Lion King, and more. I also co-directed Brother Bear.
These days my main focus is on independent projects. I’m also an art educator and run a website called CreatureArtTeacher.com – I get a ton of questions about my process and thought it would be fun to share some insights with Cartoon Brew readers about how I work.
I’ve used many types of animation software over the years but my favorite by far is TVPaint! Put simply, it’s the closest thing I’ve been able to find to working with pencil and paper! Truth be told, these days I actually prefer it to pencil and paper (Shhh!!!)
Above you will find a video I recorded a little while back where I take you through a “Quick Start” to using the software. But, I wanted to flesh out some of those concepts for you in written form below. I also wanted to share some of the animation that I’ve created in TVPaint with you. I’ve included two of my recent personal animation projects below to give you an idea of the results you can achieve. These are more tests than anything, but they are fun and I hope you like them.
This is My Process
First off, I want to stress that this is my approach to using the software. Just like Photoshop, TVPaint is deep, robust software. There are often many ways to do the same thing and each animator may have their own preferences, but for me, these things get the job done.
1. Work Big @ 24 FPS!
I like to use TVPaint in full screen mode on my Wacom Cintiq. This helps me achieve the feel of drawing on the large 16 field animation paper that we typically used in my Disney days. Also, since I am typically working on film projects, I work at 24 frames per second. It’s worth noting though that the frame rate and resolution are all settings that you can adjust to suit your needs.

2. Let’s Get Started
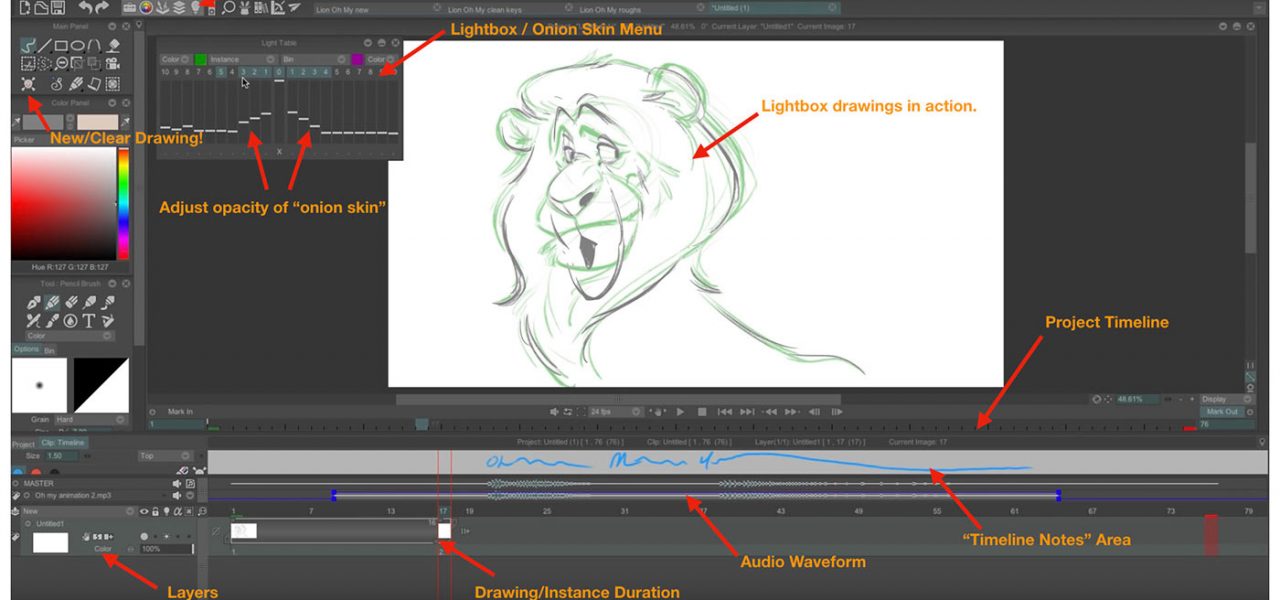
In the video example above I animated a quick little bit of animation of a lion character. First I imported the audio which was a recording of my son Dustin doing his best George Takei impression. (Side note: I had the opportunity to work with Mr. Takei on Mulan. I designed and animated the ancestral ghosts and he did an excellent job voicing the main ancestor. )

Once you import the audio track you have to set “Mark In” and “Mark Out” points. This is essentially telling TVPaint how many frames the scene will be. Once you set the In & Out points, you can “scrub” through the timeline, hear the dialog, and begin to animate. If you are familiar with video editing programs like Adobe Premiere or Final Cut this is a very similar concept.
3. Bye, Bye X-Sheets – Hello Waveform!
For many of you this is probably something you take for granted, but in the old days, to animate dialog we had to use what were called exposure sheets (aka “x-sheets” or “dope sheets”). It was actually someone’s job to listen to all of the audio of the film and write down what frame number the word sounds fell on. As animators we would use this to know what frame we had to have a character making a particular mouth shape. Not only was that very time consuming, it was also very tedious. Well in TVPaint, you are able to “see” the sounds via a visible waveform indicator. With a little practice it will become very evident where the mouth should be open and where it should be closed.
The developers of TVPaint also thought to include a “Timeline Notes” area above the dialog track, so you can make handwritten notes about the scene right in the software. This is like having the best of both worlds.

4. “Rough Out” the Scene!
Now it’s time to start drawing frames! TVPaint has some wonderful built in pencil tools. They’ve gotten their look, feel, and pressure sensitivity dialed in just right in my opinion. You can also create your own brushes and even import Photoshop brushes if you wish, but for most of my purposes the built-in pencils are perfect.
When roughing in a scene, I am trying to quickly get down the pose and attitude of the character. As you will see in the video above I move quickly from key pose to key pose and sketch those in quickly. The idea is to hit the key frames where they will generally fall along the timeline of the scene. Again it’s all about pose and attitude at this point.
TIP: To make a new drawing, move the playhead in the timeline to where you want to be and click the “Shift + K” key or click the “Skull” icon. This will “Clear” the drawing and allow you to create a new image (or “instance”). FYI: Clicking the “Ctrl + K” keys will bring up a complete shortcut menu.

5. Turn on the “Onion Skinning” to Access the Light Table
One really well thought out feature of TVPaint is the light table. This is an area where digital animation has a big advantage over pencil and paper.
When flipping drawings in 2D, we could only see small segments of our shot at one time. Flipping is achieved through sitting at our desk with our drawings on the pegs. We would put a drawing between each of our fingers and roll them back and forth in order to see the movement. Unfortunately though, you are limited to only being able to see five drawings at a time. You only have so many fingers after all.
With TVPaint you have none of those limitations! You can easily see up to 10 images before or after the frame. You can also adjust the opacity of the images and even the line color. All of this, by the way, is user customizable to suit your needs. To quickly “flip” between your drawings, use the left and right arrow keys on your keyboard.
TIP: Click the “Lightbulb icon” in the top toolbar to turn on the virtual light table and access the onionskin feature.

6. Working with Layers: Refined Drawings, Breakdowns & In-Betweens
You may have seen some animators who like to use red or blue pencils for their rough drawings, and then they draw back over them in dark pencil when it’s time to clean up the drawings. This harkens back to the days of Xerox machines. Copy machines typically don’t see the red or blue lines, so when you make a reproduction, you are left with just the refined image. This “hack” was used extensively in the 2D animation pipeline to move drawings though the production process.
Well, if you like to work that way, TVPaint has thought of that. There are virtual red and blue pencils built right in. If you use them, you can then draw on the same layer in black pencil. Next you click the “remove red” or “remove blue” buttons and your rough drawings disappear leaving only the clean-up line. It’s like magic!
Personally though, I never worked that way, even at Disney. I always preferred to put a new sheet of paper on my light table and then redraw over the top. Well, the great news is that it’s easy to do this in TVPaint as well. I simply make a new “Anim Layer” right in the project timeline. Just like Photoshop, there is no limit to the number of layers you can stack on top of one another. You can also conveniently adjust the visibility and opacity of each layer on the fly.
Of course, now that you’ve got a nice clean layer, you can spend the time to make all of the many hours of drawings needed to complete your scene. Furthermore, you can then create additional layers behind your cleaned-up lines for color. You can do all your colors on one layer or you can break each color out to its own layer. Here is the final product of this animation below:
7. Coloring Your Scene
Now that you’ve got a layer with nice clean lines, create additional layers behind your cleaned up lines for color. You can do all your colors on one layer or you can break each color out to its own layer. You can color every pixel of every frame by hand, or you can use the terrific “auto color” tools that TVPaint 11 offers. I’ve included a brief additional video below showing how that works.
Prefer to work on paper and then color digitally? You can do that too, and with the “auto-peg” registration and “auto-scan” clean-up tools you’ll find the process very fast.
BONUS TIP: TVPaint 11 has introduced a pretty amazing Auto Color tool + Automatic Peg Registration for scanned drawings.
8. Export the Movie
All Done? Great! Now that you have your scene all done, it’s time to export it and share it with the world. From the main menu select File > Export project to… This is used to convert your project into a format of your choice: animated GIF, AVI, Quicktime file, numbered frames sequence, etc. You will find this very practical as you are able to save your work in smaller files.
This option is present in the File main menu. Once selected, the following panel appears:

Just pick the format that suits your needs and you are all set!
9. Wrap-up
So there you go – those are my quick tips to getting started in TVPaint. I hope you enjoyed it.
If you are interested in additional animation lessons I have a complete lineup of courses on my website CreatureArtTeacher.com with lessons on:
- Character Design
- Animation Fundamentals
- My newest course Complete Animation Course
I also offer an Annual Premium Membership to my site where you get EVERYTHING for one flat price. Plus, right now Annual Members get a discount on TVPaint that’s good for up to 37% OFF! That means the membership pays for itself!
Click below and enter promo code “CartoonBrew” to save an EXTRA 25% OFF any order!

I also offer a variety of free tips & tricks on my YouTube Channel. I hope that this helps you put some beauty out into the world!
About Aaron Blaise
For 21 years Aaron worked with Disney helping to create some of the greatest animated films ever made. During that time he worked as an animator or supervising animator on The Rescuers Down Under, Beauty and the Beast, Aladdin, The Lion King, Pocahontas, Mulan, and more. In 2003 he was co-director of Brother Bear for which he earned an Oscar nomination for Best Animated Feature Film.
After Brother Bear he helped to develop several projects but ultimately left Disney to pursue an opportunity back home in Florida. Aaron recently served as 2D animation supervisor and character designer for the “The Bear and the Hare,” an advertisement loved by millions around the world. He is currently also working on a new animated short film, once again involving bears called Snow Bear.