Industry Artist Matt Watts Explains How To Build A Great Rig Using Toon Boom Harmony
Interested in building your career in animation? The new Toon Boom Training Courses on Rigging are intended for artists who are new to the craft and want to learn the fundamentals of constructing character rigs for studio productions, under the guidance of a remote instructor. Remote training is now also available for Cut-Out Animation, Paperless Animation, Compositing, and Storyboard Art.
Among the professionals Toon Boom approached to develop assets for its new courses is Matt Watts. Matt is an accomplished self-taught animator and rigging artist based out of Utah, who not only has a decade of freelance work under his belt but also came recommended by his colleagues from his tv production work in Canada. He recently joined the team at Digital Gravy.
Cartoon Brew is pleased to present the following conversation between Mike Schnier and Matt Watts about the care and craft that went into adapting Vanessa Bouchard’s Punk character into a cutout rig for the company’s new training courses. Watts also discusses his day-to-day experience working as a rigging artist in tv animation, as well as his advice for aspiring creators who want to work in the industry. Read their discussion below, along with previews of the Punk rig from the new training courses.
Mike Schnier: How did you approach Vanessa Bouchard’s design for the Punk rig?
Matt Watts: In approaching Vanessa’s rig, it was really important for me to make it fit with the Toon Boom Training Courses. The goal was to make something we could use to teach people how to rig in an introductory lesson, so that informed some of my decisions.
In order to build a good rig, you need to have a good turnaround reference image to build from, and Vanessa did a great job. One of the most important aspects for this reference image is for the views to make the character look as if it is turning in 3d. For the most part, the nose, eyes, chin, chest, arms, and legs should line up across all the views. Perspective may change that a little bit, but not much.
Some shows have more of a graphic style where you’ll use cheats on the hair to where it keeps the same shape through much of the turnaround. You can look at many Nickelodeon shows to see examples, like on The Loud House, Dexter’s Lab, Fairly Odd Parents, and Kim Possible.
The Punk character has a few tufts of hair, and I always find it nice to make each tuft its own piece. As I went through the turnaround I would number the pieces to help me keep track of each piece of hair as it rotates through the 180. That was useful.
It’s important to make sure the character has their arms in a default position in the turnaround. It can also be okay to work from a T-pose with the arms straight out, but I prefer the arms in a more relaxed position. Some character designers draw dynamic turnarounds with torso tilts and arms folded etc. Those kinds of turnaround can be great for traditional or paperless animation workflows, but for cut-out animation, it helps to have a default position to start from.
The benefit of having the character built this way is that you can select all the pegs and nodes in Harmony and then press R to reset them all and have them all return to the starting position. This is especially useful when you want z-depth layering and you are having a tough time figuring out which layers have z-depth info and which don’t — or if you’ve stretched and squashed the arms like crazy. You can hit R and the arm will reset everything to 0 rotation, scale of 1 and it will go back to a usable starting position.
I was writing the training material for how to teach people to build something like this rig, and we did not want to get overly complex. I was grateful to be included in the character design reviews before everything was finalized so I could give feedback to help make the rig easier to create and animate.
What was an example of the feedback that you provided while working on this rig?
Something I specifically pointed out on the Punk design was that there was originally a sleeve that came down just below the elbow, very near the joint. It made it tricky to determine whether the sleeve would move with the upper arm or the forearm. It’s a good idea to avoid putting any patterns or designs through an elbow or knee joint.
One time I built a character with tattoos running through the joint at the elbow — Harmony can totally handle it, but rigging it all involves a lot of cutters and deformers. Those kinds of rigging choices can make a rig significantly more difficult for an animator to use and heavy for the computer to process.
On the Punk, the original shoe design looked more like a pair of boots with lines running 90 degrees down from the shin to the toe. This put lines going through the joint of the foot. An animator wouldn’t easily be able to rotate the foot, they would need to adjust about four different deformer pieces — not a simple setup. It would have also involved a lot of cutter nodes and masking, so I suggested we change the shoes to something that could be easily rotated at the ankle. Those small suggestions in the character design review stage can save a lot of time for the rigging artist and even more time for animators.
We could have created the more complex shoes and put together Master Controllers to more easily manipulate them, but that was beyond the scope of creating a simple rig.
How did the project compare in scope and complexity to other rigs you have worked on?
In terms of complexity, I would say the Punk was moderate. As I mentioned earlier, there are more complex ways to set up a rig. It’s always a good idea to ask your supervisor or art director just how important a piece of the design is to them, considering the complexity it could add.
If the Punk were created as an example of a more complex rig, I would have loved to add Master Controllers. The great thing about Master Controllers is that they can save the drawing exposures and keyframe information from many layers and pegs. I could have built the shoes as they had originally been designed by using lots of deformers and cutters.
In that case, I could have done the tricky posing so the deformers would make it look like the shoe was rotating in 3d. With that information all saved into the Master Controllers, the animators would have been able to use a slider or grid widget to access all the angles without having to manually adjust all the deformers separately. I also would have preferred to build the mouth with separate layers for the teeth, tongue, and lips using deformers and Master Controllers. You can get some awesome customized shapes that will interpolate or tween nicely that way.
Then again, there is something nice about having the Punk with the mouth on one layer without deformers — you just draw custom mouth shapes when you need them.

Would you have done anything differently if this rig was intended for a tv production?
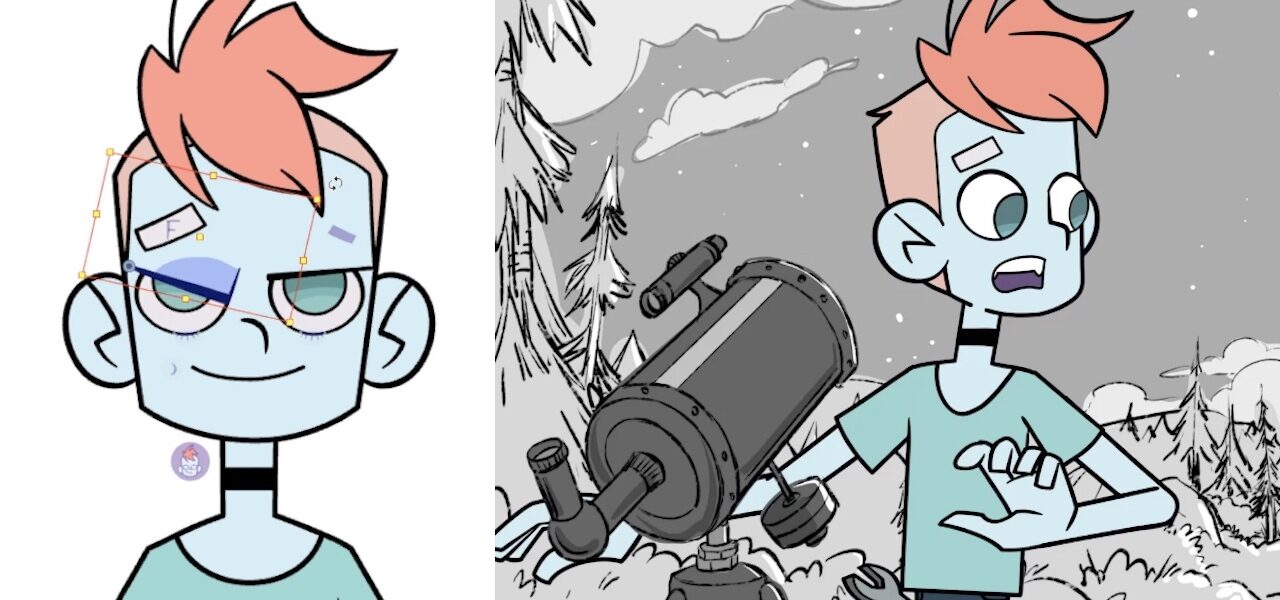
Looking back, I would have changed the expression. The character had a smirk on his face, a smile on a bit of an angle.
When I got the actual lip sync, none of those shapes matched the smirk, so it’s not an ideal default position. It is best to have the default position of the mouth closed because this will be the starting point for the mouth in every scene the animators create, or whenever the animator presses R. If you were going to use this rig in a production, I would recommend changing that.

What does an average work day look like for a builds and rigging artist in tv animation?
There are many assets that need to be created on a show. Broadly speaking, there are characters, props, and backgrounds. Your supervisor gets assigned all of these rigs that needs to be made in a list, and they will separate them out to whoever is on the team. In a large studio, you may have as many as 30 rigging artists working together. Some may even be working on different projects and shows.
When you get hired as a rigging artist, you may start by building simple props like hammers or rocks, which the characters will pick up and interact with. As time goes on, your supervisor will assign you more advanced props. After mastering the techniques needed for building props, which may take a few months to a year, you get to start building characters.
Characters use many of the same setups as props, but building them is much more involved. While props may take a few hours to build, a character may take a few days to weeks, depending on the complexity and how much the rig will be used in the production. If a character is used a lot, you really want the rig to be nice so it can work well for the animators.
As we are recording during the pandemic, one thing that I miss is getting to be around so many creative people. Other building artists making discoveries, maybe Toon Boom releases a new feature and nobody else knows about it yet and you can tell the group about it. Having that environment where you are all working together and helping each other is a lot of fun.
Honestly, in my opinion, the best way to learn anything is if you have a mentor who you can ask questions to. Sometimes it can be a little more difficult digging for a question in Google or through forum posts.
What else can be helpful to keep in mind when thinking about the role of a rigging artist at a studio?
Aside from building rigs and collaborating with pros, as a rigging artist, you need to be a good artist. You will most likely draw hundreds of original hands and feet that are not included in the character designs or turnarounds. You will need to be able to match styles of art that may be different from what you are used to, and you need to have a good knowledge of perspective.
It is also helpful for a rigging artist to have worked as an animator before joining the rigging crew so that they know how to make their rigs user-friendly.
Something to keep in mind while working is: only build what is needed. It can be so easy to spend a lot of time building a dream-rig that can do everything imaginable, but working in an animation studio is fast-paced and you have to get your assignments done quickly and efficiently.
Another drawback to overbuilding a rig is that it can often end up being really heavy for the computer to process and slow for the animators to work with. That is why it is extremely important to study the reference material ahead of time, which means checking the animatics and storyboards to make sure your rig can handle what it needs to, but is not over the top.
I was self-taught, learning Harmony over the space of 12 years by going through the Help manual. I had gone through all the YouTube videos I could find, and Toon Boom’s Learn Portal resources. Working in a studio is awesome because you can make new discoveries of workflows with friends and whenever you get stuck, someone is there to answer your questions.
What elements of the Punk rig were the most challenging to build? Which elements are you the most proud of?
The shins were some of the most challenging because the cuff of the pants needed to cut the pants but also reveal the skin. The head was also challenging to build because we needed the hair to mask to the head.
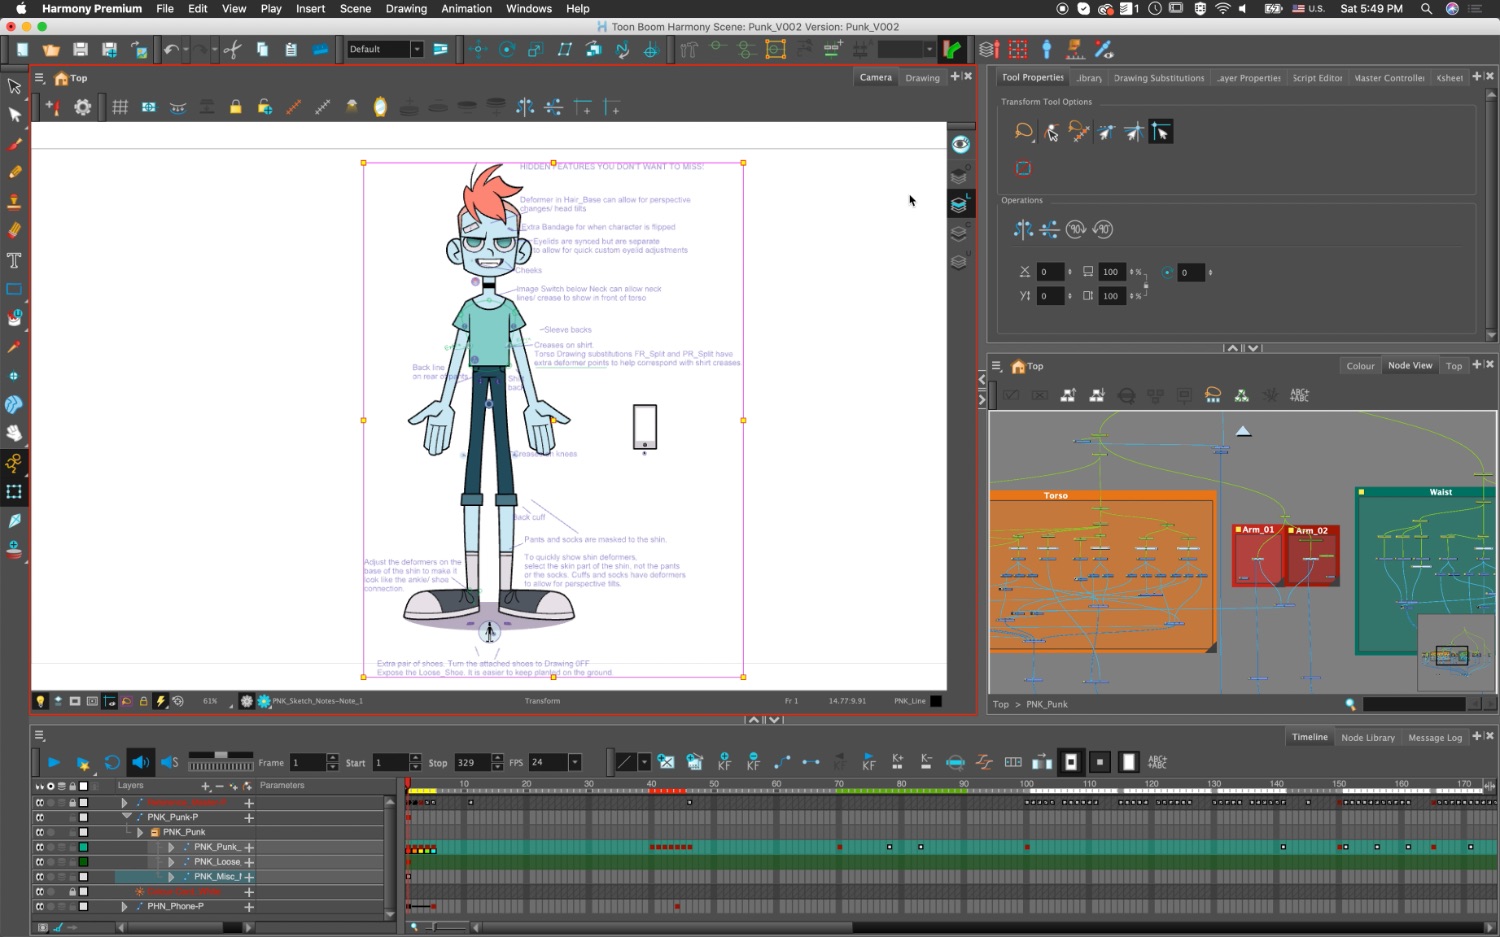
I’m honestly most proud of all the notes and annotations I left. Rigging artists are often very technically minded and they put neat features into rigs to help animators work more efficiently. In a big studio, everyone is working as quickly as they can, so it can be challenging to find a good time to tell your animator friends about all the cool features you built for them. Toon Boom recommends saving a space on the timeline to reveal all the hidden pieces of the rig or special parts that people may overlook — for the Punk, these are included on frames 40-46.
I have also included Note nodes in multiple places of the Node View where someone can click on the Note and then read detailed information about rigging setups that may be complex or unfamiliar.
We noticed that you included annotations for other artists in your rig, and we think this is a very helpful practice. What kind of information do you feel is the most important to communicate to other artists and animators?
Builders spend a lot of time crafting their rigs and sometimes include incredibly creative setups that can save animators time. Notes and annotations written out give builders a way to pass that information along to the animators. Builders always need to be thinking of how their rigs will be used by the animators. I find it best to pose at least two or three special poses with the rig before calling it done. This often brings to light any issues with the rig.
Rigging artists spend so much time, care, and love on building these characters and props. They will make it do all these cool things, but if you get busy and don’t have time to tell the animation department about it, they will miss hours worth of the effort you put in.
If an animator doesn’t know that your rig can solve a problem they have, they are going to have to figure out their own way to solve it, and that’s going to take them a lot of time. It drives me crazy to see that kind of duplication of work! I have found that leaving notes and annotations can be really helpful for avoiding this issue.
It’s also like opening a Christmas present. Toon Boom’s official rigging methodology says to save a place on the timeline to show hidden pieces of the rig — maybe you will have cheeks that usually are not visible but sometimes you want them there, or maybe a clothing crease or a fold in a swap that’s available — so you show that kind of stuff.
On the Punk, I took the practice further. If I do not have a chance to introduce my precious Punk rig to somebody, they could go through frames 40–46 and my annotations say hello to them there. These notes show all the cool things the rig can do that you might not catch if you only look at the five poses of the turnaround.
Is there a feature in Harmony that you wish more builds and rigging artists were aware of?
I wish more people would use Note nodes. Besides leaving notes in the Layer properties of the nodes, I like to also use them to unravel the mysteries behind the spaghetti-looking Node view. For example, when there are lots of cables feeding into a composite, I get confused sometimes as to which cables are coming from which pieces. So I will leave notes and rename the node itself to tell which piece a cable represents.
The Image-Switch effect node is also awesome! On the Punk, by default, the neck connects straight to the chest. This matches the character design and turnaround, but sometimes an animator might want to show the neck creases in front of the chest such as in a down-shot from above. I plugged the Image-Switch node in below the neck lines so that the neck lines will normally be cut by the autopatch of the shirt and shoulders. I created a blank empty drawing layer and also plugged it into the Image-Switch. That way, we can keyframe the Port Index property of the Image-Switch to tell it Port 1 default cuts the neck lines with the autopatch info. Port 0 cuts the neck lines with an empty drawing, so it doesn’t cut the lines. Instead, we will see the neck lines.
I have come across multiple uses for using the Image-Switch, especially when you want to do a lot of z-depth layering with objects behind a character’s neck but in front of hair hanging down behind the neck. Since many people are not familiar with the Image-Switch node, I usually leave a Note node or an annotation written out somewhere to let others know it’s there. The key here is that I leave the default position the way most people would expect it to be and if they look into all the bonus features I have included, they will find ways to work more efficiently.
I would also recommend Visibility Nodes combined with Tabs or Handles. Some users may be unfamiliar with this concept — you create a “tab” or circle toggle that animators can click on to quickly select parts of the rig that may normally be difficult to select.
For example, the head has many layers. If you were to select the nose, you would need to press B to parent up multiple times before selecting the head. It is common to parent up too far and then press Shift B to parent back down to the peg you need to select. A Tab connects straight to the Master peg for the head or arm or leg so that when you select it and then parent up once, you are at the right place to animate. Or if you use the Transform and Animate tools and choose Peg Selection mode in the Layer Properties, you can click the tab in the Camera View and it will automatically parent up to the master peg.
I like to put tabs on features such as the head, the arms, the torso, and the legs. I also like to put them on some features of the mouth if the mouth pieces are built separately, such as for the tongue or lower teeth, which are often not visible. The trick to using tabs is that you put a Visibility node below them in the Node View and you uncheck “Soft Render” so that the tab only shows up in the Camera View. When you render it, the tab is not visible.

What should artists keep in mind when designing and rigging characters for tv animation?
Only build what is necessary. As mentioned earlier, don’t draw anything on the joints. Most of the animation for characters in tv will use the front to three-quarter-front angles. I always like to build the straight-on front view first and then the three-quarter view. I like for those views to interpolate perfectly.
The profile, back, and three-quarter back views can all be separately drawn if in a rush. As mentioned earlier, you want to understand what the character needs to do. If you are working on a snappy show, you may not need to use any deformers at all. On a show where you really want a lot of finesse on the character animation, you’ll often use a lot of envelope deformers.
Organization is also important. I’ve worked on shows where there have been over a hundred swaps for the hands. Which is great — we don’t have to draw them again, unless animators can’t find a hand because there’s no order to them. I like to organize the hands in a way so that similar hand shapes are grouped together. I like to have a prefix for the defaults, and I like to also add an underscore along with the angle.
For example: default_000, default_090, default_180, default_270. If I ever need to draw another default pose between those drawings, I’ve got enough padding that I can put it in and add default_022. I like to organize hands this way so animators can swap through and it essentially looks like the hands are rotating in 3d. And then you have the next hand pose, and it also looks like it’s rotating in 3d.
If you have 200 hands and you haven’t bothered to organize them, it is really hard for animators swapping through to find a pose — because if they are toggling through to find a pose that is not there, that is time needlessly lost.
What advice would you give to a student who is interested in pursuing a career in tv animation?
Work hard. Be patient. Use the free Toon Boom Learn Portal resources. Sign up for one of the professional Toon Boom Training Courses. If you can afford it, going to a college or university that specializes in animation will do a lot to get your foot in the door. You can also go to animation or comic conventions to meet professional animators.
I can’t say enough about how important and beneficial it is to meet people in person instead of just sending in a resume. Make sure your demo reel is short and only includes your best work. Thirty seconds to one minute is usually a good target range. You don’t want to overwhelm busy people you meet.
You can even reach out to professionals you admire on social media platforms like Instagram. I would recommend giving praise on specific aspects of their art that you like. You can do better than just saying “Cool!” You can say, “Wow! The way you added squash and stretch to that that character was brilliant!” Then go ahead and ask a specific question like, “Was that all hand-drawn or did you use keyframes to stretch it?”
Take criticism with gratitude. If you are asking someone for specific feedback about a demo reel or portfolio, make sure you only show them two or three pictures or 30 seconds’ worth of animation — unless they beg for more. Ask them what you can improve on. Go work on that and then follow up the next year the conference happens — or if you can follow up on social media or email, that can also be great. Build up your Linkedin contacts and clean up your social media and online presence so that it is professional.
Research the studios you want to work for. Make sure that their values and mindset match yours, so that you can enjoy the job and feel happy about contributing. Be willing to climb the ladder in the company. Take any opportunity available and as you provide value to the company, they will be willing to discuss opportunities for advancement.
Networking with people is one of the best things you can do to find a job. You never know who other people will know.
Do you have any other recommendations that you would like to mention to our readers?
Take your learning one step at a time. I would highly recommend that Harmony users go back through the Release Notes through the versions of Harmony to find cool features they may have missed. I spent about eight years learning Harmony on my own. One day I finally decided to go to the very introductory starting tutorials. I’m glad I humbled myself and did that because I ended up learning quite a few workflows and shortcuts I had missed.
I recommend learning Harmony’s default shortcuts as you get familiar with the program. I know, if you’re used to other software, it might drive you a little crazy having similar tools with different shortcuts, but after you get used to the defaults, you may understand why they are in different places on the keyboard for different workflows. After you have become familiar with the defaults, that is when I would recommend customizing your shortcuts to help you keep your hand in one place on the keyboard to minimize how much you need to look down at the keyboard.
Good equipment can also be purchased for a reasonable price these days. The best quality drawing tablets are still Wacom’s brand, but sometimes they can be expensive. The XP Pen Artist 15.6 Pro is a great alternative that costs much less and still delivers quality pen pressure and an on-screen drawing experience. I have one of those for my laptop and a larger Cintiq for my desktop.
I have recently started using an Ergotron vertical mouse with a dedicated middle mouse button. It’s weird to get used to but I can now work for 14 hours straight without my wrist hurting! I feel it is worth the money to go to an office supply store to test all their chairs and find one that will help you keep good posture while staying comfortable.
It’s worth investing in a computer that can handle Harmony. Take a look at the system requirements page. Photo- and video-editing software usually will work just fine if you order along the lines of what Harmony needs. If you can get a Solid State drive for your operating system, it will speed startup and processing times immensely.
As I mentioned earlier, the Toon Boom Learn Portal is a great place to start learning Harmony. I would recommend going through the different Journeys through Paperless Animation, Cut-Out Animation, Rigging, or Compositing. You can also sign up to take online classes with a professional.
You can start learning Harmony Essentials if you like and then upgrade to Harmony Premium once you start seeing a need for different features you’d like to use. Two of the biggest reasons I use Harmony Premium are the benefit of having the Node View and being able to use additional types of deformers.
Want to see more of the Punk rig? This character is used in Toon Boom’s instructor-led Cut-Out Animation and Rigging Training Courses, which are now accepting applications. You can also see more examples from Matt Watts’s professional work on his website, and he is on Instagram as @mattwattsart.